My favorite part of installing trim...
...and by "favorite," I obviously mean least favorite, worst part of installing new trim: caulking and filling nail holes.
What you'll need if you're about to tackle a caulking project:
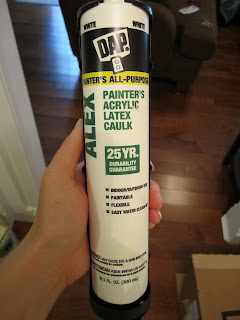
One tube can get you pretty far, but we have a lot of trim (wainscoting, chair rail, etc.) so I estimated about one tube per room. Make sure you get the paintable kind!!
So as a reminder, here's a picture of a corner of crown moulding pre-caulk. It's all gappy and ugly, right?

Here it is with the caulk fresh out of the caulking gun, still all goopy and messy. Not much better, really...

Here's where the magic happens. The only tool you need for smoothing caulk is...wait for it...your finger! You don't need one of those "pro caulk" tools or anything, so don't waste your money.


Filling the holes is pretty straight-forward. We chose to use DAP DryDex Spackling with the Dry Time Indicator. It goes on pink and turns white when it's ready to sand or apply another layer, how cool is that?!

I just use a cheap putty knife. I go through putty knives rather quickly, because they tend to rust (or end upsnatched borrowed for some other project and ruined) and then I need a new one, so I don't bother to spend a lot on them.
I don't have any pictures of actually filling in the nail holes, but I think it's pretty self-explanatory. Plus, there's nothing to see once the holes are filled in anyway--which I'm pretty sure is the whole point!
Some things I've learned about filling in nail holes:
P.s. Just when I thought I had gotten a handle on all the caulking and nail hole filling-in, I walked into the house to see this yesterday:

Yeah, that's new chair rail in the hallway. *sigh*
What you'll need if you're about to tackle a caulking project:
- Painter's caulk (duh)
- Caulking gun
- Paper towls
- Wet rag

One tube can get you pretty far, but we have a lot of trim (wainscoting, chair rail, etc.) so I estimated about one tube per room. Make sure you get the paintable kind!!
So as a reminder, here's a picture of a corner of crown moulding pre-caulk. It's all gappy and ugly, right?

Here it is with the caulk fresh out of the caulking gun, still all goopy and messy. Not much better, really...

Here's where the magic happens. The only tool you need for smoothing caulk is...wait for it...your finger! You don't need one of those "pro caulk" tools or anything, so don't waste your money.
 |
| Waste of money. I know this because we bought one. |
Anyway, back to your index finger. You'll want to get as much of the excess caulk off as possible, and when you're working on something detailed like this corner block, make sure the caulk doesn't fill in all the intricacies. (you would never be able to use the pro caulk on a corner block like this...just saying!)


The easiest part is caulking a straight line, obviously. If you're caulking the underside of crown moulding, you might notice that gravity takes over unless you "smoosh" the caulk into the crack. I found that the easiest way to do this was to hold my gun perpendicular to the wall, lightly squeeze the trigger, and make a swift back and forth motion, "smooshing" the caulk into the crack as I go. Then, just use your finger to smooth it out and remove the excess, wiping it on a paper towel to discard.


You might feel like you're wasting a lot of perfectly good caulk...if that's the case, sometimes you can use what you pull off and apply it in the next spot. It's a bit messier that way, but if you're like me and hate wasting money, it should make you feel at least a little better.


You might want to keep a wet rag handy, because as the caulk dries on your fingers they'll feel pretty gross. You'll need to keep rinsing out your rag, too.
Some tips I learned along the way:
- Keep your nails trimmed short...it's much easier to smooth caulk with a smooth fingertip.
- Use really cheap paper towels...you're going to use a lot!
- Switch fingers occasionally...mine started to get a little raw, so I had to keep switching so that one finger didn't get all calloused.
- If at first you don't get the crack filled entirely, let it dry and come back with another layer later.
- A smaller opening on the end of your tube = less wasted caulk. Seems pretty obvious, but it's true.
- A smaller opening also means you'll be squeezing harder, which could result in sore wrists much faster than normal.
- Even though this painter's caulk is supposedly "sand free," there are a few spots I will have to sand smooth before I can paint.
Filling the holes is pretty straight-forward. We chose to use DAP DryDex Spackling with the Dry Time Indicator. It goes on pink and turns white when it's ready to sand or apply another layer, how cool is that?!

I just use a cheap putty knife. I go through putty knives rather quickly, because they tend to rust (or end up
I don't have any pictures of actually filling in the nail holes, but I think it's pretty self-explanatory. Plus, there's nothing to see once the holes are filled in anyway--which I'm pretty sure is the whole point!
Some things I've learned about filling in nail holes:
- Sometimes your finger is much easier than a putty knife when your surface isn't flat.
- You might need to keep a hammer and nail set handy, for those pesky nails that didn't get sunk in all the way.
- You might find that even with the hammer and nail sink, some of those buggars will still stick out. If you have a dremmel tool, you can try that...or just do what I do and paint over them and hope no one notices :)
- Make sure you buy a spackle that's sandable. If it's not, you need to get it basically perfect while everything's still wet.
- Read the fine print! I read one that said "paintable with both oil-based and latex paints," but when I read the fine print, you were supposed to apply an oil-based primer before applying any latex paint. Say whaaaaa?
P.s. Just when I thought I had gotten a handle on all the caulking and nail hole filling-in, I walked into the house to see this yesterday:

Yeah, that's new chair rail in the hallway. *sigh*


Comments
Post a Comment