Trim, trim, and more trim
Yeah you guessed it, this is an update about trim. We finally got James' tools back after he lent them to a friend, so we were able to put up the crown molding in the entryway and dining room. We were tired of messing with figuring out the right angles for crown (upside down and backwards?? WHAT?!), so we decided to cheat and get corner blocks:
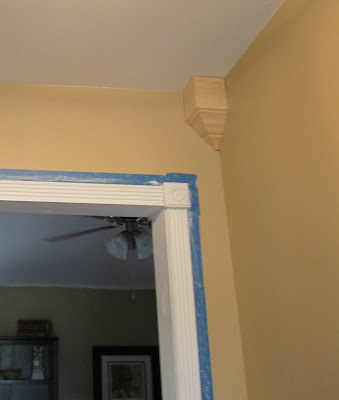
No, it's not meant to be the same color as the wall, it just looks close. It will get painted white.
If you're going to be hanging crown any time soon, we found that the easiest way is to find and mark your studs first, like so:

Then, just start at one end with a pneumatic nail gun and work your way to the other end, putting in one nail on the bottom and one on the top at each stud. You can also use nails wherever it looks gappy. Yeah, that's an official term. The pressure from the pneumatic nail gun should suck most gaps closed. Here's the first piece all done:


Once we finished the crown in the entry and dining room, it was time to finally add the picture ledge to the board and batten in the entry. We decided to use 1 x 3 primed MDF, the same as what we used on the vertical boards in the board and batten. We had to angle the corner on one side, so people wouldn't impale themselves when they walk around the corner from the dining room. Here's how that looks:

It looks good, but it's still missing something, wouldn't you agree? How about a nice piece of trim along the bottom of the ledge to finish things off:

Now I just need to fill nail holes and touch up the paint, and we're good to go! The wall behind the door will get some coat hooks, too.
Another little "dude, get on that already" project that we tackled was putting trim on the window in the living room. We were hesitant to put trim on, knowing that eventually we plan to replace all the windows in the house, but since that could be a long ways off, we decided to go ahead and trim out the window in the meantime. Here is a diagram I found here so that you'll know what parts I'm talking about:


No, it's not meant to be the same color as the wall, it just looks close. It will get painted white.
If you're going to be hanging crown any time soon, we found that the easiest way is to find and mark your studs first, like so:

Then, just start at one end with a pneumatic nail gun and work your way to the other end, putting in one nail on the bottom and one on the top at each stud. You can also use nails wherever it looks gappy. Yeah, that's an official term. The pressure from the pneumatic nail gun should suck most gaps closed. Here's the first piece all done:

Much easier than the whole "upside down and backwards" thing, right? We thought so, too! Here's James nailing in a piece, with a sneak peak of the progress.

Once we finished the crown in the entry and dining room, it was time to finally add the picture ledge to the board and batten in the entry. We decided to use 1 x 3 primed MDF, the same as what we used on the vertical boards in the board and batten. We had to angle the corner on one side, so people wouldn't impale themselves when they walk around the corner from the dining room. Here's how that looks:

It looks good, but it's still missing something, wouldn't you agree? How about a nice piece of trim along the bottom of the ledge to finish things off:

Now I just need to fill nail holes and touch up the paint, and we're good to go! The wall behind the door will get some coat hooks, too.
Another little "dude, get on that already" project that we tackled was putting trim on the window in the living room. We were hesitant to put trim on, knowing that eventually we plan to replace all the windows in the house, but since that could be a long ways off, we decided to go ahead and trim out the window in the meantime. Here is a diagram I found here so that you'll know what parts I'm talking about:
So basically, we needed all new casing, the stool, and the apron. We wanted a wide stool because the cats like to sit in the window and look out, and Bella has gained a little weight (but don't tell her I said that!) Anyway, here is what the stool and apron look like installed:

We also had to get an extra-wide apron, because we didn't quite get the drywall close enough to the window when we installed it...oops :-/
Then it was on to the casing. We wanted to mimic the rosettes and fluting we used throughout the rest of the living room, so here's what we came up with:

Here's the finished product. I think it makes the window look brand new!!

Alright, that's pretty much it for what we accomplished this weekend. We got a lot done and we feel good about it! Next up, the beadboard in the dining room...


This trim is gorgeous!
ReplyDeleteThanks, Jess!!
Delete